• Skip to main content
  • Skip to primary sidebar
Mamá Maggie's Kitchen
menu icon
go to homepage
  • Recipe Index
  • By Category
    • Agua Frescas
    • Appetizers
    • Beef
    • Breakfast
    • Chicken
    • Dessert
    • Drinks
    • Pork
    • Salsa Recipes
    • Seafood
    • Side Dishes
    • Soup
    • Tamales
    • Vegetarian
  • Contact
  • About
    • Facebook
    • Instagram
    • Pinterest
    • Twitter
    • YouTube
  • search icon
    Homepage link
    • Recipe Index
    • By Category
      • Agua Frescas
      • Appetizers
      • Beef
      • Breakfast
      • Chicken
      • Dessert
      • Drinks
      • Pork
      • Salsa Recipes
      • Seafood
      • Side Dishes
      • Soup
      • Tamales
      • Vegetarian
    • Contact
    • About
    • Facebook
    • Instagram
    • Pinterest
    • Twitter
    • YouTube
  • ×

    Home » All Recipes » Dessert

    Chocolate Covered Coconut Balls

    Published: Dec 10, 2024 by Maggie Unzueta

    These Chocolate Covered Coconut Balls are the perfect bite-size treat. Just a handful of ingredients are needed to make this yummy no-bake dessert.
    Jump to Recipe
    Plate of chocolate-covered coconut balls topped with shredded coconut. One ball is cut in half, revealing a white coconut filling. The plate is set on a white cloth with more coconut balls in the background.
    Plate of chocolate-covered coconut balls topped with shredded coconut. One ball is cut in half, revealing a white coconut filling. The plate is set on a white cloth with more coconut balls in the background.

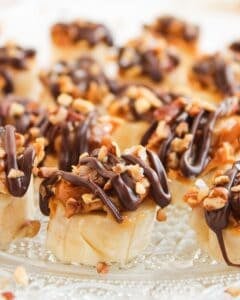
    Chocolate Covered Coconut Balls are sweet, delicious, and incredibly easy to make.

    This post may include affiliate links. As an Amazon Associate I earn from qualifying purchases.

    These bite-sized treats really hit the spot when you’re craving something sweet.  Perfect for gift giving, Christmas cookie exchanges, or just because. 

    Looking for a unique holiday gift? Try Jamoncillo (Mexican milk fudge)!

    Table of Contents

    • 1 🥥 Ingredients
    • 2 🥣 Instructions
    • 3 Variations
    • 4 🫙 Storing Instructions
    • 5 🍰 More Dessert Recipes
    • 6 😋 Hungry for More 
    • 7 Chocolate Covered Coconut Balls
      • 7.1 Ingredients
      • 7.2 Instructions
      • 7.3 Notes
      • 7.4 Nutrition

    🥥 Ingredients

    Top view of dessert ingredients on a white surface, including bowls of powdered sugar, shredded coconut, and coconut milk, a plate with dark chocolate pieces, and a small container of vanilla extract. Labels identify each ingredient.
    • Shredded coconut
    • Coconut milk (or sweetened condensed milk)
    • Powdered sugar 
    • Vanilla extract
    • Dark chocolate (for coating)
    • Coconut oil (optional)

    Only a handful of ingredients are needed to make the chocolate balls. 

    I’m using coconut milk to reduce the sugar. Swap out for sweetened condensed milk if you want a sweeter dessert. 

    🥣 Instructions

    Side-by-side images of a food processor. Left: dry ingredients like flour and spices in the bowl, with a hand pouring liquid from a white bowl. Right: the same mixture blended into a coarse, moist texture.
    • In a food processor combine shredded coconut, vanilla, coconut milk, and powdered sugar. Blend until the mixture is sticky enough to hold its shape. 
    • Take about 1 tablespoon of the mixture and roll it into a ball. Repeat with the remaining mixture and place each ball on a lined tray or plate. 
    • Roll into balls then place them in the freezer for about 20-30 minutes to firm up.

    The mixture should hold together when pressed. If it’s too crumbly, add 1 tablespoon at a time of sweetened condensed milk (or coconut milk, if using), until it holds together.

    Chopped chocolate pieces on a wooden cutting board against a white background.
    • While the balls are chilling, melt the chocolate with coconut oil (if using).
    • Do this in a microwave or a double boiler until smooth.

    Coconut oil helps create the shiny coating, but it is optional. If you are making them to give as a gift, I highly recommend using coconut oil.

    Take this dessert up a notch and use Mexican chocolate instead. 

    Coconut balls on parchment paper, some dipped in chocolate with coconut sprinkles. A bowl of melted chocolate with a spoon is at the bottom. The layout shows the dipping process in two stages.
    • Use a fork to dip each coconut ball in the melted chocolate. 
    • Allow any excess chocolate to drip off. 
    • Then place the coated ball back on the lined tray.
    A tray of chocolate-covered balls, some with coconut flakes sprinkled on top. One ball is cut open, revealing a white filling. A spoon with chocolate remnants is nearby, all on parchment paper.
    • Sprinkle extra coconut before the chocolate sets.
    • Let the chocolate harden by placing the tray in the fridge for 1 hour.
    • Serve and enjoy!

    Variations

    Make this recipe your own by substituting for milk chocolate, almond extract, maple syrup, honey, or protein powder. Top with sprinkles for a festive touch. 

    A plate of chocolate-covered coconut truffles, some topped with shredded coconut. A few truffles are bitten into, revealing a creamy white coconut filling. The plate is on a light surface with a blurred background.

    🫙 Storing Instructions

    • Store in an airtight container or resealable bag for up to 2 weeks. Place in a dark cupboard or somewhere where there is no moisture. 
    • You can also store them in the fridge or freezer, but make sure the bag is well closed so the balls will not absorb any odors.
    • They’ll last up to 4 months in the freezer and 1 month in the fridge. 
    A plate of chocolate-coated coconut balls, some topped with shredded coconut, arranged on a table. More treats are visible in the background, adding to the display of these delicious desserts.

    🍰 More Dessert Recipes

    • Hojarascas (Mexican Shortbread Cookies)
    • Mexican Wedding Cookies
    • Flan de Queso 
    • Fruit Tartlets (with vanilla pastry cream)

    These Chocolate Covered Coconut Balls are yummy and easy to make. Only a handful of ingredients make this no-bake dessert recipe. Perfect for the holiday season!

    😋 Hungry for More 

    Be sure to subscribe to my newsletter and follow along on Facebook, Instagram, Pinterest for my latest recipes and videos.

    Did you make this recipe? Please rate the recipe below.

    Plate of chocolate-covered coconut balls topped with shredded coconut. One ball is cut in half, revealing a white coconut filling. The plate is set on a white cloth with more coconut balls in the background.

    Chocolate Covered Coconut Balls

    These Chocolate Covered Coconut Balls are the perfect bite-size treat. Just a handful of ingredients are needed to make this yummy no-bake dessert.
    No ratings yet
    Print Pin Rate
    Course: Dessert
    Cuisine: American/ Mexican
    Prep Time: 15 minutes minutes
    Cook Time: 0 minutes minutes
    1 hour hour 30 minutes minutes
    Total Time: 1 hour hour 45 minutes minutes
    Servings: 24 balls
    Calories: 102kcal
    Author: Maggie Unzueta
    Prevent your screen from going dark

    Ingredients

    • 2 cups shredded coconut
    • ½ cup coconut milk (or sweetened condensed milk)
    • ⅓ cup powdered sugar
    • 1 teaspoon vanilla extract
    • 1 cup dark chocolate for coating
    • 1 tbs coconut oil optional

    Instructions

    • In a food processor combine shredded coconut, vanilla, coconut milk,(or sweetened condensed milk, if using) and powdered sugar.
    • Blend until the mixture is sticky enough to hold its shape.
    • The mixture should hold together when pressed.
    • If it’s too crumbly, add more coconut milk (or sweetened condensed milk, if using). 1 tablespoon at a time, until it comes together.
    • Take about 1 tablespoon of the mixture and roll it into a ball.
    • Repeat with the remaining mixture and place each ball on a lined tray or plate. Roll into balls and freeze.
    • Place the coconut balls in the freezer for about 20-30 minutes to firm up.
    • While the balls are chilling, melt the chocolate with coconut oil (if using) in a microwave or a double boiler until smooth.
    • Use a fork to dip each coconut ball in the melted chocolate.
    • Allow any excess chocolate to drip off, then place the coated ball back on the lined tray.
    • Top with more shredded coconut or sprinkle before the chocolate hardens.
    • Let the chocolate set by placing the tray in the fridge for 1 hour.
    • Serve and enjoy!

    Notes

    • Storing Instructions
      Store in an airtight container or resealable bag for up to 2 weeks. Place in a dark cupboard or somewhere where there is no moisture.
    • You can also store them in the fridge or freezer, but make sure the bag is well closed so the balls will not absorb any odors.
    • They’ll last up to 4 months in the freezer and 1 month in the fridge.

    Nutrition

    Calories: 102kcal | Carbohydrates: 9g | Protein: 1g | Fat: 7g | Saturated Fat: 6g | Polyunsaturated Fat: 0.1g | Monounsaturated Fat: 1g | Trans Fat: 0.002g | Cholesterol: 0.2mg | Sodium: 22mg | Potassium: 88mg | Fiber: 1g | Sugar: 7g | Vitamin A: 3IU | Vitamin C: 0.1mg | Calcium: 7mg | Iron: 1mg
    Tried this recipe?Mention @MamaMaggiesKitchen or tag #MamaMaggiesKitchen!

    More Mexican Desserts

    • Peppermint Oreos dipped in chocolate and white chocolate are topped with crushed peppermint candies and arranged on a wooden surface, with whole peppermint candies nearby.
      Peppermint Oreos
    • Three white chocolate Snowman Truffles with candy eyes, red candy buttons, green candy scarves, and coconut flakes sit on a white plate, with a soft, festive background.
      Snowman Truffles
    • A plate of Pumpkin Pie Spice Rice Krispie Treats shaped like cups, filled with an orange mixture and topped with a mini marshmallow, arranged neatly on a light pink dish.
      Pumpkin Pie Spice Rice Krispie Treats
    • Five chocolate-covered caramel and pecan lollipops on wooden sticks, drizzled with caramel, are arranged on a woven placemat. Caramel candies and pecan pieces are scattered around them.
      Chocolate Turtle Apple Slices

    About Maggie Unzueta

    Maggie Unzueta is the face behind In Mama Maggie's Kitchen. She has been publishing Mexican recipes and creating delicious recipes since 2010. From family recipes to her extensive travels throughout Mexico, she brings traditional Mexican flavors from South of the Border and into your kitchen. Maggie has been featured in notable culinary websites and other media outlets. For more details, check out her About page.

    Reader Interactions

    Leave a Reply Cancel reply

    Your email address will not be published. Required fields are marked *

    Recipe Rating


    Primary Sidebar

    A picture of Maggie Unzueta in her kitchen holding a coffee cup.

    iBienvenidos! I'm Maggie. Welcome to my blog! My passion is authentic Mexican food and traveling throughout Mexico to bring you the very BEST in culture and cuisine.

    More about me →

    Popular

    • Birria de Res, or Mexican Beef Stew, in a brown bowl topped with chopped onions and cilantro.
      Slow Cooker: Birria de Res, or Mexican Beef Stew + VIDEO
    • Camarones a la Diabla served next to white rice and lime wedges.
      Camarones a la Diabla [VIDEO]
    • Menudo, or Pancita, is Mexican comfort food at its best. Served for Sunday brunch and shared with lots of love. By Mama Maggie’s Kitchen
      Mexican Menudo Recipe + VIDEO
    • Instant Pot Pork Tamales stacked and ready to cook. Surrounded by cilantro and decorative Mexican kitchenware.
      Instant Pot Pork Tamales [VIDEO]
    • Caldo de Camarón, or Mexican Shrimp Soup in a white bowl with a rich, guajillo sauce. Spoon lifting shrimp and avocado. Cilantro and lime on a dark brown table.
      Caldo de Camarón – Mexican Shrimp Soup + VIDEO
    • Carne En Su Jugo in a white bowl topped with cilantro beans bacon
      Carne En Su Jugo + VIDEO

    FEATURED IN


    Online publications Mama Maggie's Kitchen has been feature in.

    Footer

    ↑ back to top

    Info

    • Privacy Policy
    • Cookie Policy
    • Accessibility Policy

    Subscribe

    • Sign Up! for emails and start cooking Mexican food today!

    Contact

    • About Maggie
    • Contact

    © 2010-2025 · Mama Maggie's Kitchen ·

    Rate This Recipe

    Your vote:


    A rating is required
    A name is required
    An email is required